Payroll
Set up and run Payroll: pay lines, pay rates and rules, pay schedules, crews and upsells, each pay period, job overrides, bonuses and deductions, alerts, and the old Payroll page.
Written By Noah Sanches
Last updated About 21 hours ago
Payroll in Rotor has been rebuilt. It tracks every dollar each team member is owed, lets you approve it line by line, and can run on a pay schedule. This guide walks through setting it up and running it, in the order you'll do it.
Where: Web only, Financials → Payroll. Who: Owners and admins.
Rotor does not send money. Marking a line Paid only records that you paid it. You still pay your team the way you do today.
Payroll is on the Pro Plan. If you don’t see Payroll under Financials, reach out through in-app support. If on a lower plan, it can also be enabled separately as opposed to fully upgrading.
1. How payroll works
Rotor works out pay in the background and stores it as pay lines. Each line is one amount owed to one person, like a technician's commission on one job or hourly pay for one shift. Changes to a job, shift, or rate show up within about a minute.
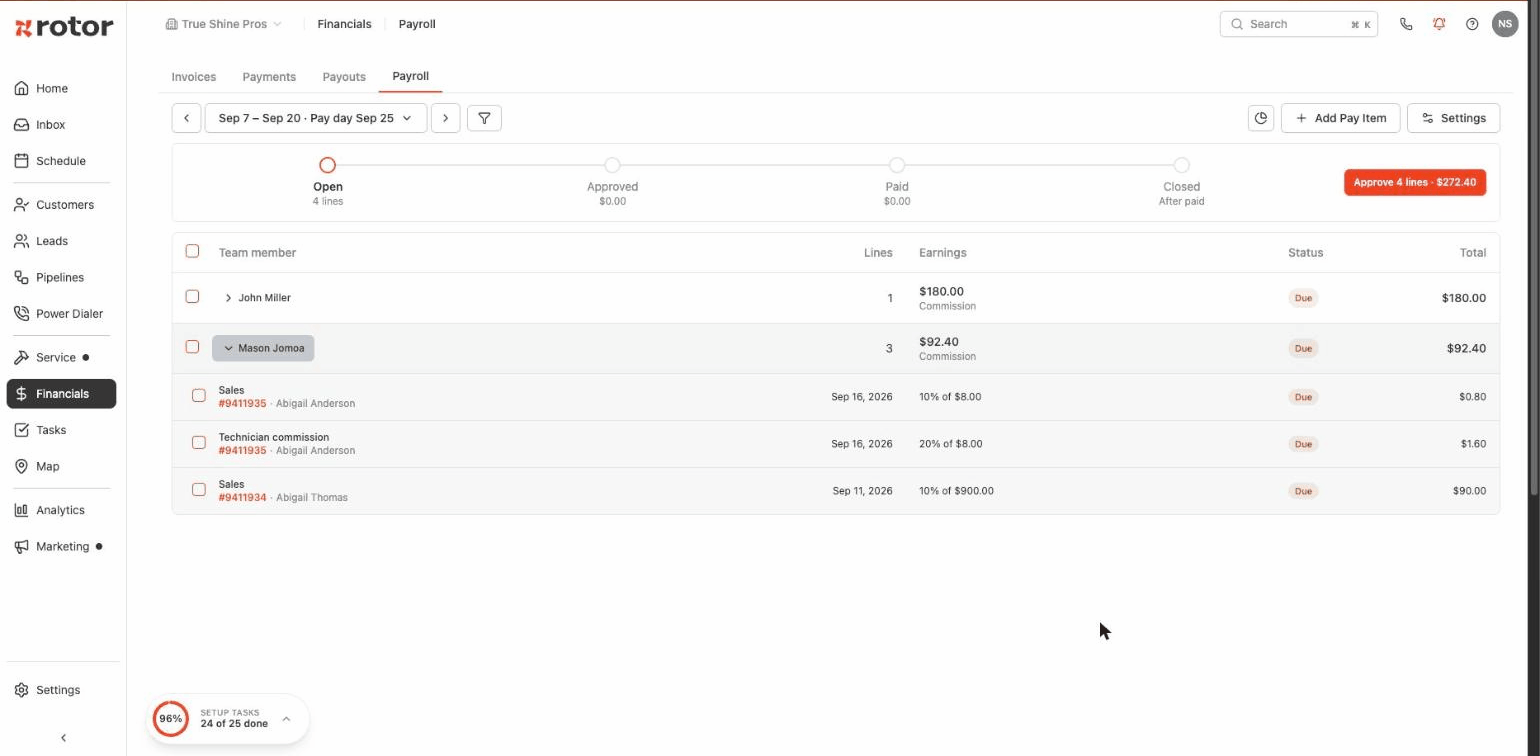
Every line moves through three statuses:
Due: the line exists and needs your review.
Approved: you've checked it.
Paid: you've recorded that it was paid.
An Approved line whose amount changes goes back to Due, so you can review it again.
A Paid line never changes. If the job changes after payment, Rotor adds an Adjustment line for the difference, plus or minus.
Mark Unpaid returns a line to Due and recalculates it, so its amount can change.
Example: Eli was paid $60.00 on a $300 job at 20%. The price goes up to $350, so Rotor adds a +$10.00 adjustment.
2. Set your pay rates
Where: Financials → Payroll → Settings → Pay Rates, or Settings → Team → a team member → Commissions.
Start here. If nobody has a rate, jobs pay nothing. Set company-wide defaults for each role first, then give individual people their own rates only where they differ.
Under Role Defaults, click Technician and enter a Default commission rate.
Optional: click Rates by Frequency for a rate per plan frequency, or fill in Rates by Service for a specific service.
Repeat for Salesman and Upsells.
Under Team Members, click a person to set their Hourly Pay (Technician, Salesman, or Office rate in $/hour) and any commission rates that differ from their role.
Click Save Changes. Rotor shows a Save Rate Changes? prompt listing which unpaid lines will change. Confirm to save.
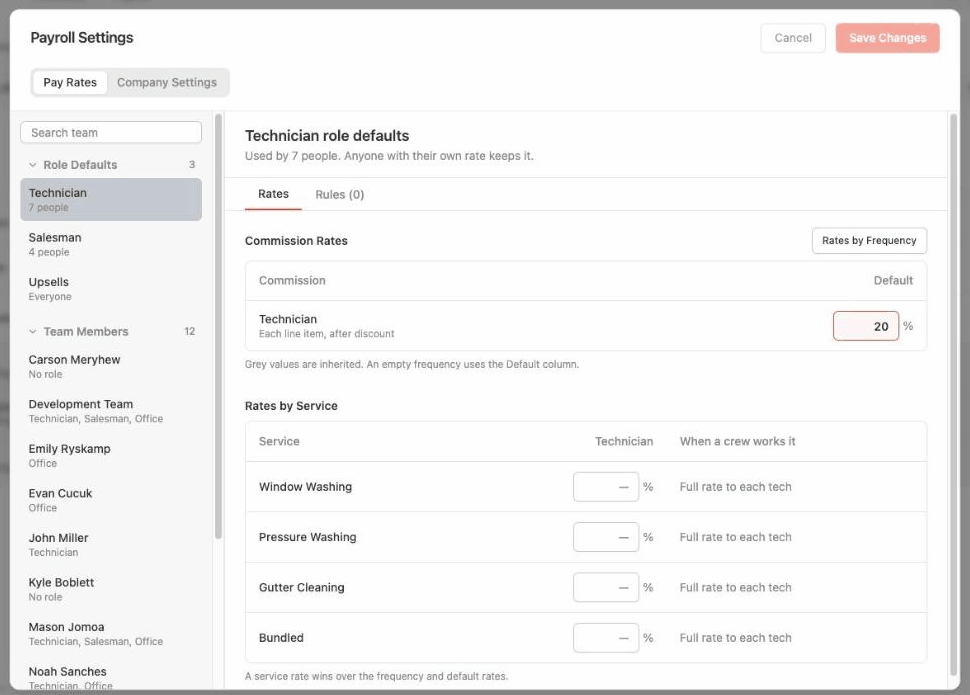
Grey numbers are inherited from the role. A highlighted box is that person's own rate.
Leave a box empty to use the inherited rate. 0 is a real rate and pays 0%.
No rates yet next to a person means neither they nor their role has a rate.
All commission rates apply to each line item after discount. Saving a rate never changes lines that are already Paid.
Which rate wins? For each line item, Rotor uses the first rate it finds, checking the person's own rate before the role's at each step:
The item's service rate
The plan's frequency rate
The default rate
Nothing found: 0%
Example: the Technician role pays 20% default and 25% on Window cleaning. Eli has his own 18% default.
3. Add rate rules
A rule changes a rate when a line matches a condition. Use rules for the exceptions, like paying more on a specific service or less when a big crew is on the job.
In Pay Rates, open a role (Technician, Salesman, Upsells) or a person, then click the Rules tab and Add Rule.
Under When, pick a condition: plan frequency, service, plan includes, technician count, or a price book line item. Click + And to require more than one condition.
Under Then, choose Add %, Subtract %, or Set to and enter the amount.
Click Add Rule, then Save Changes.
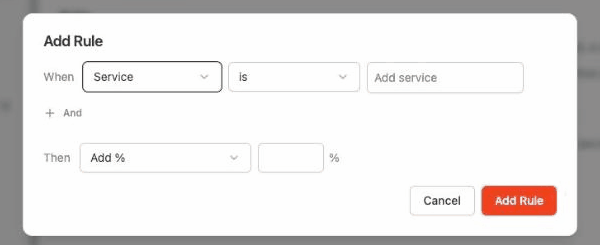
Rules on a role apply to everyone paid that type. Rules on a person apply only to them. Flip a rule's switch to turn it off without deleting it.
Adds and subtracts stack on top of the rate that won.
If a matching rule says Set to, it wins and the adds are ignored.
The result always stays between 0% and 100%.
Technician count matches an exact number, so add one rule per crew size you want to treat differently.
Example: base rate 20%. A Technician rule adds 5% on Window cleaning. Eli has his own rule that subtracts 2% when 2 techs are on the job. On a Window cleaning item with a crew of 2, Eli earns 23%.
4. Set your pay schedule
Where: Payroll → Settings → Company Settings → Pay Periods.
A pay schedule splits payroll into pay periods, so you review and pay one period at a time. It's optional, but you need one for the period checklist, closing periods, payroll alerts, and clawbacks.
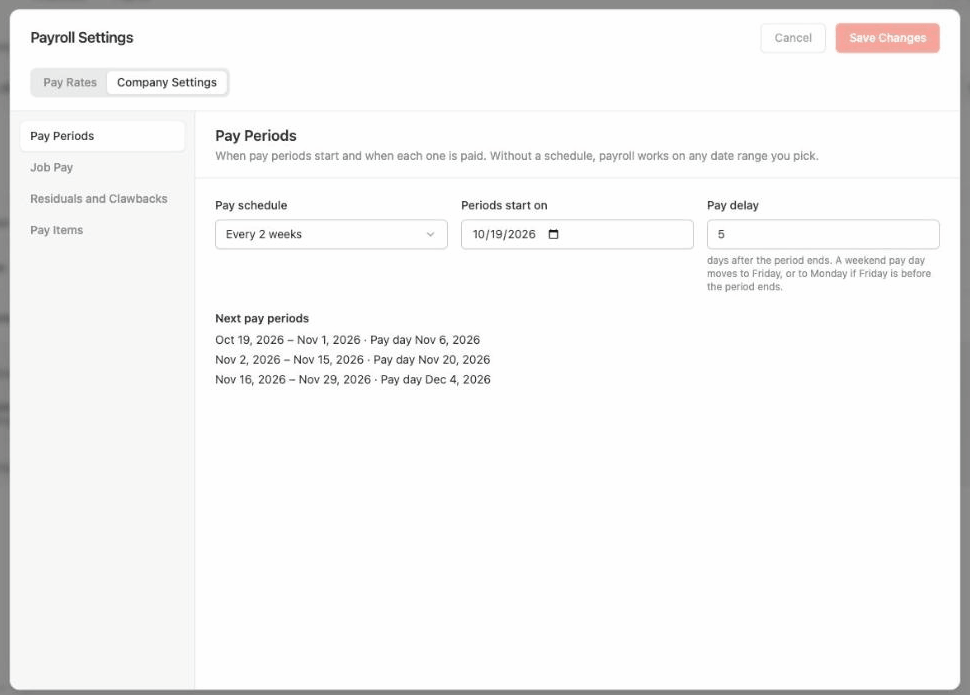
Pick a Pay schedule.
For Weekly or Every 2 weeks, set Periods start on.
Set Pay delay: how many days after the period ends you pay (0 to 31). A weekend pay day moves to the Friday before, or to Monday if that Friday is before the period ends.
Check Next pay periods to confirm the dates look right, then click Save Changes.
Which period does a line land in?
Job lines: the period holding the job's completion date.
Hourly lines: the period holding the shift's start. An overnight shift stays whole on the day it started.
Pay items: the period you pick when adding them.
A line whose period is already closed lands in the next open period.
You can't change the schedule while any period is closed. Reopen closed periods first. Changing only the pay delay doesn't move anything.
5. Choose how crews and upsells are paid
Where: Payroll → Settings → Company Settings → Job Pay.
Crews: set a Default for all services, then override it for any service that's different. Out of the box, every service pays full rate to each tech.
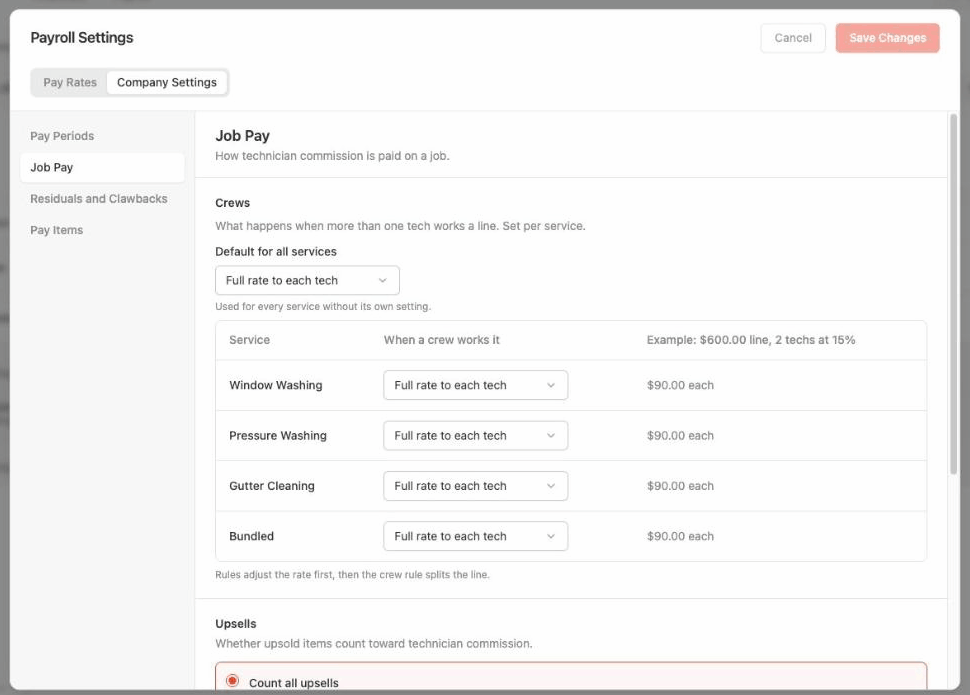
Split by time uses each tech's finished visit timers. Rate rules adjust the rate first, then the crew rule splits the line. Tips always split evenly.
Upsells: choose whether upsold items count toward technician commission.
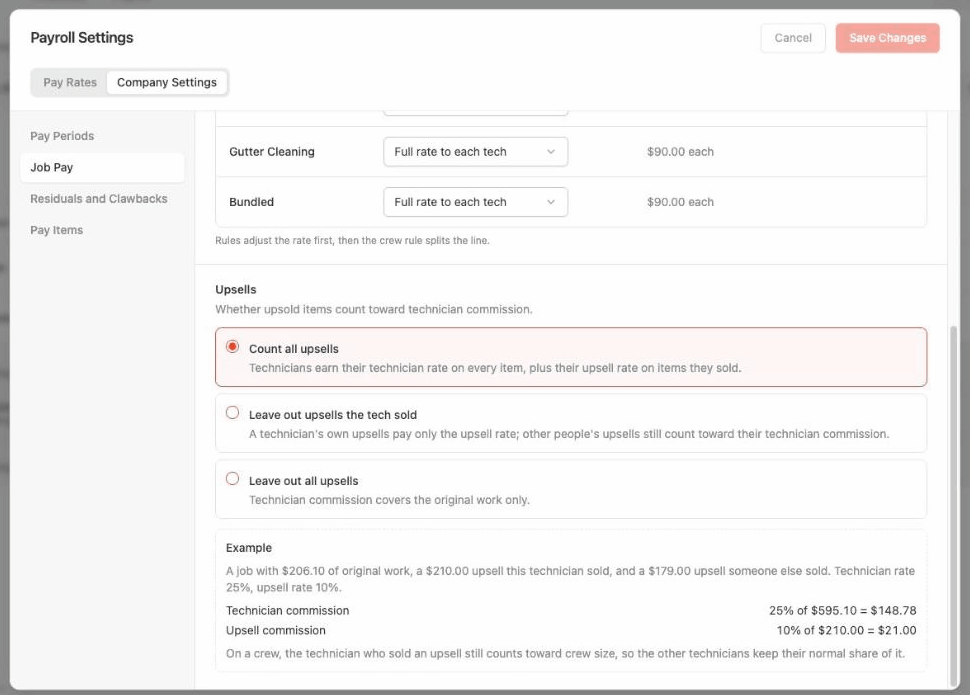
The Example box on the settings screen works your pick through before you save. If you pick a leave-out option, make sure Upsells under Role Defaults has a rate, or techs without their own upsell rate earn nothing on upsells they sell.
6. Run payroll each period
Where: Financials → Payroll.
With a pay schedule set, the page opens on the latest period that still needs approving or paying. A checklist above the table walks you through it: Open → Approved → Paid → Closed.
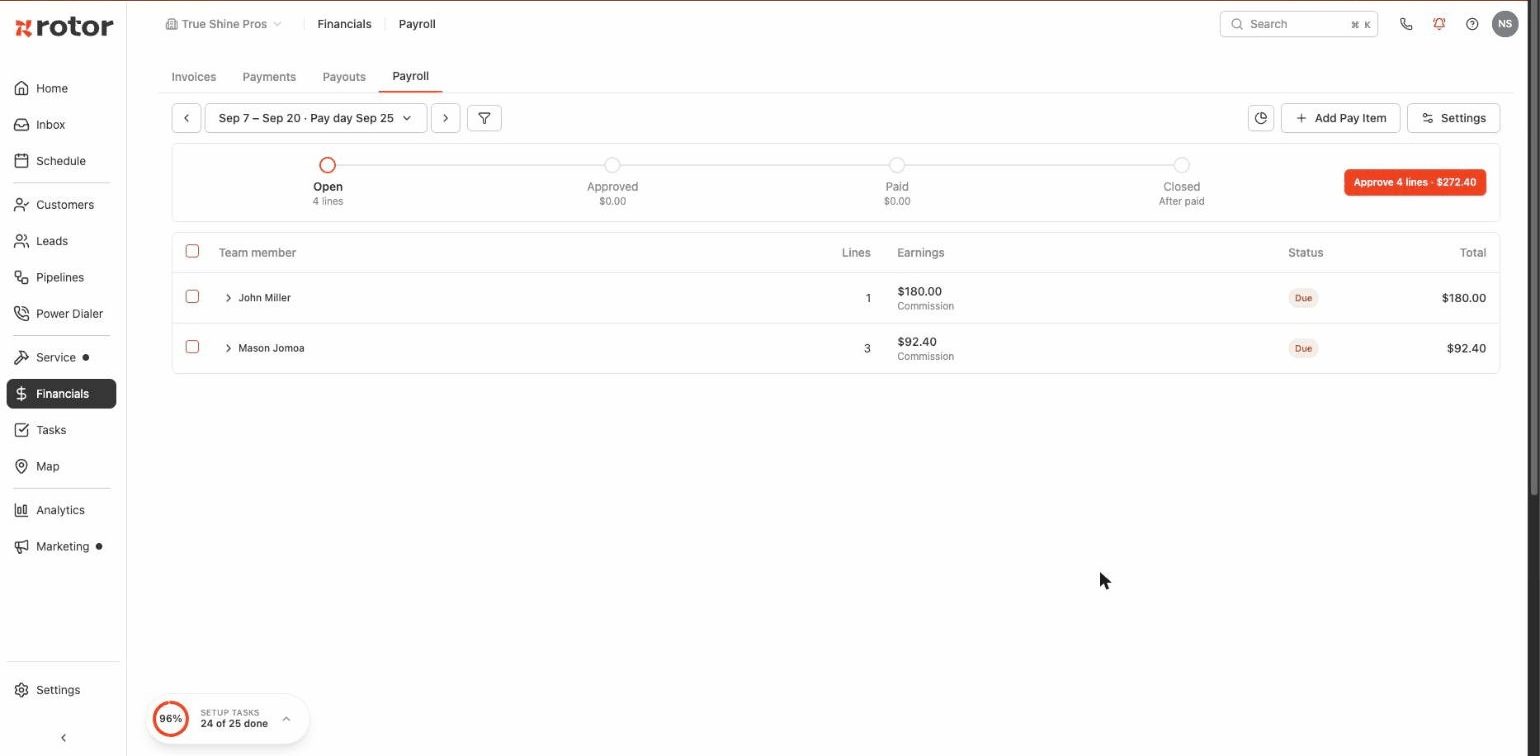
Use the arrows beside the period picker to move between periods.
Check the banners at the top and fix anything they flag.
Review the lines by Team member or by Job (see below). Click a job number to see that job's full breakdown (section 7).
Click Approve X lines. This approves every Due line in view, or only the lines you ticked.
Pay your team the way you normally do, then click Mark X lines paid and confirm.
Once everything is paid, click Close period. A closed period is locked, and late changes land in the next open period. To change something, click Reopen.
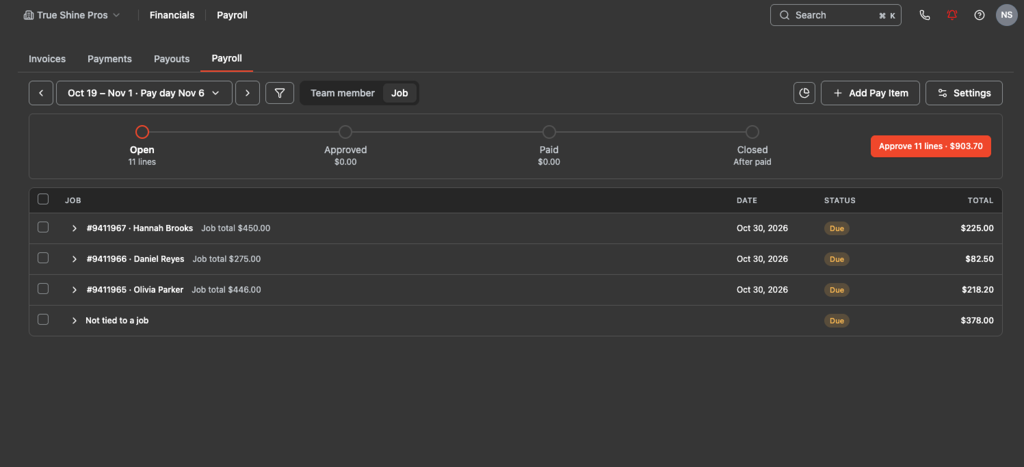
View by team member or by job: Use the Team member / Job toggle next to the filter button.
Team member: one row per person. Expand a row to see each of their pay lines.
Job: one row per job, with the customer and the job total. Expand a row to see every pay line tied to that job, like technician and sales commission.
Not tied to a job: in Job view, pay lines that don't belong to a job (hourly shifts, bonuses and deductions, clawbacks) are grouped here.
Banners to watch for:
Payroll is updating: Rotor is recalculating. Amounts may change in the next minute.
Completed jobs have no technician assigned: those jobs pay no technician commission until you assign one.
Overridden jobs: jobs you set to pay differently (section 7).
Other tools on the page:
Filters: payroll type, status, and role. Totals and downloads follow your filters.
Earnings vs. Total: Earnings adds up positive lines only. Total includes adjustments and deductions.
Payroll breakdown (pie chart button): payouts by category and person.
Download: a CSV of the selected lines for your payroll provider or bookkeeper.
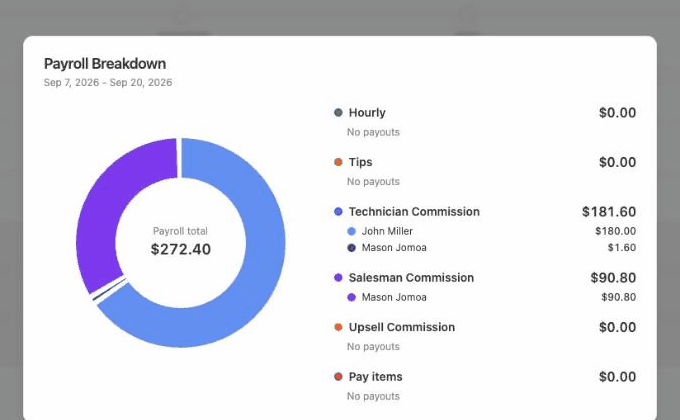
No pay schedule? Pick any date range, tick lines, and use Approve and Mark Paid in the bar at the bottom.
7. Check a job and change how it pays
Click any job number on a pay line to open that job's Commission Breakdown. It's the fastest way to answer "why was I paid this?" It shows each person's math, the rate that won, and what the company kept.
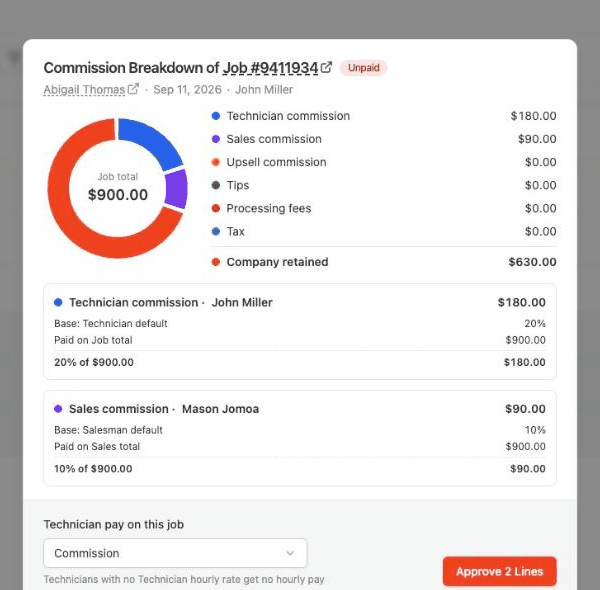
Pay one job's techs differently: pick an option under Technician pay on this job. It saves right away.
Hourly pay uses each tech's finished visit-timer time on the job, at their Technician hourly rate.
Time already paid by a clocked-in shift is never paid twice.
Salesman commission, upsell commission, and tips are not affected.
Once a tech's line on the job is Paid, the choice locks. Mark their lines unpaid to change it.
8. Add bonuses and deductions
Where: Financials → Payroll → Add Pay Item.
A pay item is a one-off bonus or deduction you add by hand, like a $25 bonus for a 5-star review or a uniform charge. Rotor never changes it on its own.
Optional: tick people or lines on the Payroll page first. They're filled in for you.
Click Add Pay Item and pick the Team Members (up to 50; each gets their own line).
Pick the Item. It's tagged Bonus or Deduction and may fill in a usual amount.
Enter the Amount each as a positive number. Deductions are subtracted automatically.
Add a Reason (optional unless the item type requires one), pick the Pay period, and click Add Pay Item.
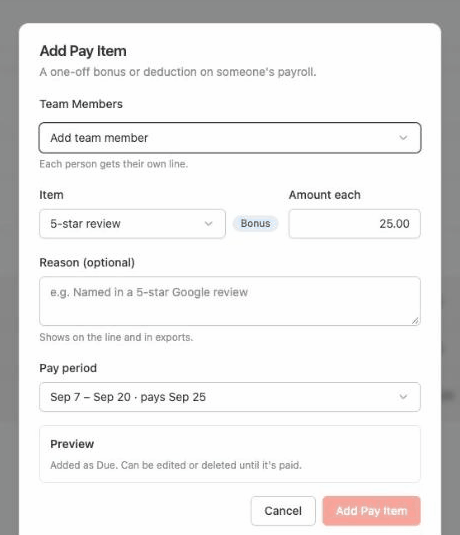
Pay items start as Due and get approved and paid like any other line. To edit or delete an unpaid one, click its title. To fix a paid one, Mark Unpaid first.
Example: Ava has a $100.00 commission, a $25.00 bonus, and a −$40.00 deduction. Her row shows Earnings $125.00 and Total $85.00.
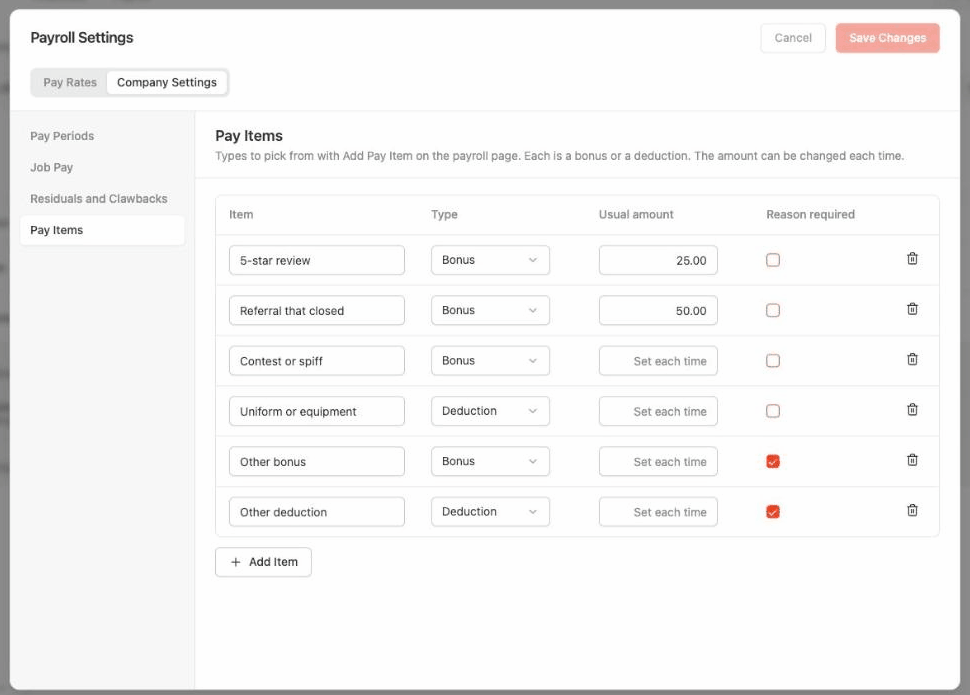
Set up your item types in Company Settings → Pay Items. Each type has a name, Bonus or Deduction, an optional usual amount, and a Reason required checkbox. You start with six and can add up to 30.
9. Turn on payroll alerts
Where: your profile menu → Notifications → Payroll.
Owners and admins get a morning alert when payroll needs them. Alerts need a saved pay schedule.
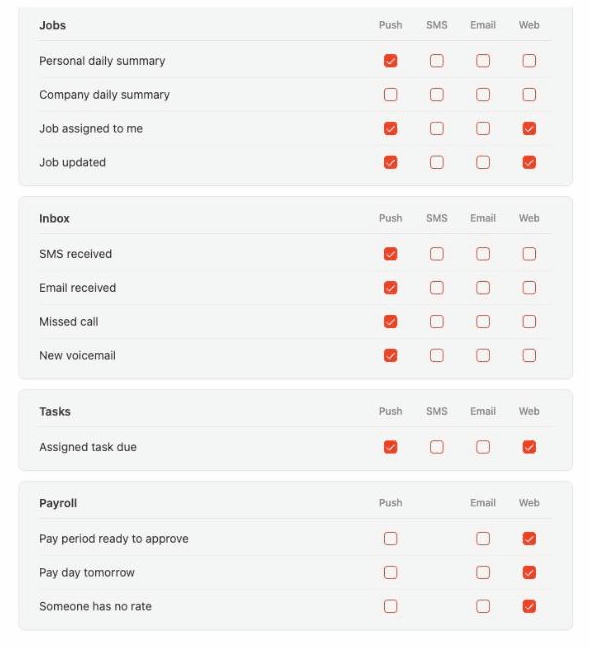
Alerts show in the Activity Feed by default. Tick Push or Email to get them on your phone or in your inbox. Each admin sets their own.
10. Residuals and clawbacks
Want to keep paying sellers on a service plan's later jobs, or take commission back when a plan cancels early? Both are optional and off by default. See Residuals & Clawbacks.
Good to know
Payments you recorded on the old Payroll page show here as Paid, and Rotor never pays the same work twice.
Upsell commission is only paid on Completed jobs.
A full hourly shift is counted on the day it starts.
Payroll is web only. There are no payroll screens in the mobile app.
Running payroll
Pick a date range. Commission lands on the scheduled visit date. Hourly pay comes from hours worked in the range.
Expand a team member to see their lines: salesman, technician and upsell commission, plus tips.
Click the Info button on a line to see the job's breakdown: job total, technician pay, salesman pay, upsells, tips and what the company kept.
Use the Unpaid only and role filters to narrow the list.
Click Download CSV for your records, then Run Payroll to mark the selected lines paid.
How lines are paid
Salesman commission: a percentage of the job total.
Technician commission: a percentage of the job amount. Each tech on a shared job earns their rate on the full amount. Use a Technician count modifier if shared jobs should pay less.
Upsell commission: a percentage of the upsold item only, paid on top of technician commission. A 17% tech rate plus a 20% upsell rate means 37% on an item the tech both sold and serviced.
Setting rates
Go to Financials → Payroll → Rate Settings, or Settings → Team → a team member → Commissions. Set a technician, salesman, upsell and hourly rate per person.
Modifiers add to or subtract from a rate based on the job, set separately for technician, salesman and upsell:
Frequency: e.g. quarterly plan jobs add 2%.
Service type: e.g. one-time jobs subtract a set %.
Technician count: e.g. 2-tech jobs subtract 5%.
When the new Payroll is turned on, anything you marked paid on the old page carries over as Paid.
Have additional questions? Contact us through the in-app chat or email support@getrotor.com.
Related articles
Residuals & Clawbacks — pay sellers on later jobs, take commission back on early cancels
Commission Tracking — how sales and upsells get credited to the right person
Tips — how tips reach payroll
Time Tracking — the hours behind hourly pay
Team Members & Seats — roles and pay types per member
Financials: Invoices, Payments, and Payouts — Payroll sits under Financials
Was this helpful?
Still need help? Ask the team