Engagement Settings: Sender Email, Texting Number & Consent
Set up the sender email, texting number, and texting consent that your customer messages depend on. Carrier registration for your number (A2P 10DLC) has its own guide, linked below.
Written By Jeffrey Rose
Last updated About 1 hour ago
Step 1: Open Engagement Settings
Go to Settings → Engagement.
Here you’ll find sections to adjust your email sending capabilities and SMS communication.
Step 2: Set Up Your Texting Number
Rotor uses Twilio with Surge for texting and voice services. You can use a new number or port your existing number (see Porting Numbers to Rotor).
Click the setup button within the Surge section.
Complete the carrier campaign registration (A2P 10DLC). You’ll need your EIN, your legal business details exactly as they appear on your EIN letter, and a link showing you collect texting consent (see below). For the full checklist of what to gather and how approval works, see A2P 10DLC Registration.
Choose an area code for your number. If your preferred area code isn’t available, select an alternative. You can contact our support team to adjust this number or check further availability.
Save your progress at any time.
Collecting Consent for Texting
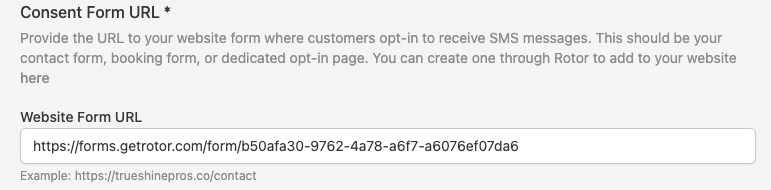
Phone registrars require proof that your business collects consent to message customers. You can create a consent form directly in Rotor:
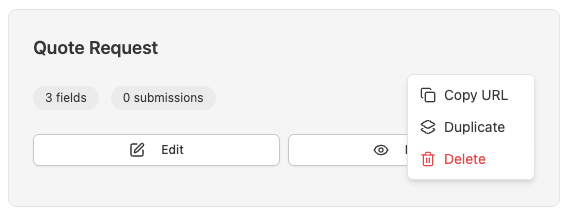
Build a web form in Rotor (found under Forms → Web Forms) and make the phone number field required.
Include a consent checkbox—this is what registrars require.
Save the form and copy the URL. Paste it into the phone registration section.
After submitting, approval usually takes 2–3 days (sometimes up to a week). Once approved, the number will be active.
Rotor supports multiple phone numbers, which is helpful if you operate in different markets.
Nicknaming Your Numbers
If you manage more than one number, you can give each one a nickname so your team can tell them apart at a glance. In Settings → Engagement, select the number and enter a Nickname — for example, Main Line, Sales, or Support.
Nicknames appear in the Inbox alongside the number, so you can see which line a call or message came in on without memorizing the digits.
Step 3: Set Up Your Email Sender (Optional)
When you first sign up with Rotor, your account comes with a default sender email that uses a get-rotor domain. This email is already registered against spam filters, so your messages will usually land in inboxes or the promotions tab.
If you want your emails to appear more professional and send from your own domain (e.g., contact@YourBusiness.com), you can connect your domain:
Go to the domain setup screen in Rotor.
Enter your domain without
https://—just the domain name (e.g.,yourbusiness.com).Follow the on-screen instructions for your DNS (Domain Name Server) provider (Squarespace, Amazon, etc.).
Make sure the record type matches what Rotor instructs, then copy the values and add them to your DNS.
Click Verify Domain. Verification can be immediate or take some time.
After your domain is verified, you can customize the sender email before the @ symbol. For example, you could use team@yourbusiness.com while keeping the sender name as your business name.
Step 4: Integrate iMessage (Optional)
For iMessage communication via Blooio:
Enter your phone number.
Provide the API key from Blooio.
Learn more about this integration on Rotor’s website.
Tips
You don’t need to rush changing your default sender email—it’s safe and already registered against spam.
If your business doesn’t have an EIN yet, you’ll need one to complete the phone campaign registration.
Use forms and URLs to collect consent properly—this is required for phone number approval.
You can customize sender emails and phone numbers to match your branding and regional needs.
Congratulations! Once your phone number is approved, you’re ready to start texting and calling through Rotor.
Have additional questions? Our team is ready to help you succeed. Contact us through the chat or drop us an email at support@getrotor.com.
Related articles
A2P 10DLC Registration — carrier registration your texting number needs
Porting Numbers to Rotor — bring your existing business number
Client Messaging Settings — choose which automatic texts customers get
Desktop and Mobile Calling — calls, routing, and voicemail on that number
Still need help? Ask the team